Showing posts with label Projects. Show all posts

Tuesday, 5 December 2023

Kick Ass - Pt2

 The long-awaited sequel to my ordering of a rumble motor is here!


The question to answer first is, is it worth it?


Yes. Yes, it was worth the $250 or so I spent on DIY. And No, no it wouldn't be worth the $600+ (Aud) you'd spend on a kit to do exactly the same thing. Right, now that's out of the way, as you're doing this anyway, to the build...


Installation was easy. There's any number of gadgets and plates you can buy online to fit a DaytonAudio shaker to 8040 profile rigs. All of them look terrible.

Why? You want your shaker to be as tightly coupled to your rig as possible, any flex is lost fidelity. And looking online various Etsy and eBay sOlutions looked great, would have been a pain to fit, and would have ended up with something akin to a big guy on the end of a diving board (ask me how I know what that's like). So rubbish... 

I did briefly toy with 8040 cross members (two of them) and all the accompanying bracketry and in that the price went through the roof - so I decided to go ghetto on it, behold;


The only sticker on my rig. Tasteful.


Yes, it looks crap, but read on!

It looks like a poor fit, but in fact, works really well... the reasoning for this two-bolt approach?
Essentially the magnet being flung about inside is only going up and down, there's no lateral movement, so no need to worry about the thing rocking back and forth.

Fitting like this I drilled out the mounting holes to take the standard t-slot (M8 I think) bolts, then bolted it down directly to the rig. Above you can see the seat, so it's directly beneath my butt. Perfect placement in fact.

As an aside, there's a soft pad that sits on the base of the speaker. I get that if I were fitting that to a sofa or something as a movie kicker, but I want the full flex, so I re-tightened it a few nights later and sure enough, it had relaxed. 

Are there better ways to fit it? Not for $0 there isn't. I'm not sure if another way would get more "action" out of the kicker, but how I have it is plenty so I'm happy. If I'd not been I'd have invested in something more designed. Try this approach first!

I had a win on the amp side of things too! With my original rig purchase, I bought a keyboard and tablet mounting rig, it was ridiculously over-engineered, resembling an armored car mounted on the end of a Waldo arm. So I had spare parts (I should post all the places I've used the kit, it's impressive), specifically the lower clamp bit for the keyboard, hard to describe, but it mounted under my mouse plate like this:


By Design!

I don't think it could have fitted better to be honest. Loose cabling has since been sorted with Etsy cable clamps which is far cheaper than the official - no way I'm paying $20 postage for 10 tiny bits of plastic!

Configuration

One of the key reasons I shunned a proper solution was reviews talking about using SimHub as a driving app for the "proper" kits - so there's no benefit in having to pay for the software, and then it becomes easy to buy the hardware (see Pt1).

I'll not bore with the technical details of connectivity and running a usb sound card to the back of this amp, it's all simple stuff.

SimHub is comprehensive, I found that out the hard way, and you can set your rumble shaker up to basically be on all the time, it's easy to saturate the effect. 

So I took an informative + immersion route and set this:


What do we have...

  • RPMs - set to a slow(ish) rumble at idle, and then cut out at any revs. 
    • This is for immersion - as I join the grid or am in the pits my whole rig rumbles like it's a lumpy idle. Excellent.
  • Gear Shift - set to kick on up/down shift. This is really apparent in paddle and sequential shifting,
    • This is immersion - it's just cool to feel a bit of a kick on shifting - most reviewers have this on too, and I can see why.
  • Wheels Lock - set to screech (high frequency) on locking. Overrides every other setting.
    • This is informative - it really is a shocker when you lock up. Feels horrible, training me nicely!
  • Road Impacts - set pretty low, still rubbish on Bathurst
    • This is mostly for immersion - it does let me know if the track is really bumpy, as in losing traction. I don't have this setting very high as it can saturate the shaker easily.
  • Road Rumble - set for curbs etc.
    • This is informative and actually does help with immersion. This is an excellent setting that means when I clip a curb I feel the rumble. That coupled to sound in headphones and I'm tricked into 'feeling it' on the left and right-hand sides respectively. Very cool.

And that's it. It's worth noting I'm using a DD1 with a 918 rim - which has rumble motors in the wheel itself. I'm also using V3 Clubsport pedals which have near-useless motors in the brake and accelerator. All of this in a fairly stiff rig means I get an absolute ton of feedback, any more and it would be counter-intuitive. 

As it is, I'm sure it's not to everyone's taste, we all want different things and indeed race in different environments. But for me, it's just right, I use this profile on every game I race on (AMS2, ACC, AC, RRRE, Forza, and so on) to get a consistent feedback experience, and I love it.

Would I do it again, yep, it's worth the initial cost and effort to set up for sure.

Sunday, 24 September 2023

Kick Ass - Pt1

A cursory spin through this blog and it's clear that thanks to zero actual budget I've spent a relative fortune on my sim budget. It's all simulation, right?

But what to spend some cash on this month... One thing that many reviewers (and some that don't have the gear for free even) have stated really improves their game is the Butt Kicker system - honestly I avoid online FPS games for the very reason I don't want my ass kicked, but this is different...

You see, one of the things missing in sim racing is haptic feedback on anything other than the wheel, which is very unlike real life where there's feedback all over the place, much is in the seat of your pants in fact.

And whilst my setup does have rumble motors in the wheel (not just the steering, it's complicated) and also some weedy things going on with pedals too, it doesn't really do much 'seat of the pants'. Somehow, and I'm not really sure, it does shake the frame occasionally, and whilst it's mild, it's certainly something that extends the immersion beyond the wheel - I want more!

Enter the Butt Kicker. In every sense, imagine stapping a sub-woofer speaker to your seat and then having it rumble for things like hitting the curbs. This is exactly what it is, just the official "butt kicker" does it in a nice package, pre-built and plug-and-play. It's also priced to suit the I don't care, I just want it, brigade. I'm not that.

What I am though is happy to drill holes in seats and frame (maybe not the frame) and to make up my own sweet solution for less. And this is that...

A bit of research and it's really not hard:

  • A speaker/shaker
  • An amp to drive it
  • Some form of sound card output
  • Software to make it work
  • Just enough cable to make it look terrible, and not fit perfectly
The software is easy, https://www.simhubdash.com/ is free and actually has a module to drive third-party butt kickers - in fact, it's recommended for the official gear which has its own solution anyway.

The rest I've had to buy, I probably have the cables, but they'll be old and feeble, and frankly I'd like new gear!

(prices are in Aud$, which basically is ten times whatever you think you're spending).

Speaker

Research led me to the DaytonAudio driver, which if I get from a fancy shop is upwards of $200 easily, on Amazon is $170 or (And guess where I went) from eBay is $109 + $10 delivery. Bargain.

Fitting is going to be easy enough if I'm brave enough to drill holes in the base of my seat. Clue: I am.

Amp

Nobsound seems to be the way to go (why is everything butt/nob related!).
There are two options, one (Nobsound G2 Mini Subwoofer) which appears to be well tested and plugs into a sound card, and the other which can do Bluetooth & be a sound card. The latter seemed to have a few "it keeps dropping out" comments, and whilst it's the work of a moment to pause a movie (if you're using this setup for movie kicks) it's a pain if you're getting mixed messages whilst concentrating on making it to last within two laps.
So I've opted for the simpler (and slightly cheaper) option, which looks to be easy to set up in any case. I'm all for simple!

That was also an eBay special at $63 shipped. Also cheaper than anywhere else I might add.

The rest of it I got from Amazon. I probably could have hunted around on eBay for the cheaper cables, but frankly, it was a pain, and really down in the lower-priced stuff you're gambling a bit for a few dollars. One order it was then...

Sound card and cables


The princely sum of $53 shipped. And no stress over the sound "card" - this is not recreating the Teatro la Fenice, this is sending some rumbles so my ass (with less fidelity than my ears I reckon) can sense a gear change or something.. low-fi it is. Oh, and the sound card is needed for the Butt Kicker setup too, so not a unique cost.

Wrap up

So all up around $230 or so compared, and I just checked, to the $649 for the 'official' gear. Quite the saving and that was without adding in shipping.

Will it measure up? Some folks reckon it's easily as good as the official gear, time will tell. I certainly have the challenge of mounting this in a way that won't break my seat, something that I'm actually looking forward to - once I have the gear I'll figure it out.

I'll also post in a pt.2 to this once I've done it, detailing how I built it and how it plays out.

Till then!

Saturday, 29 January 2022

And so it passes

 Today I listed my G29.

It's been a great wheel, but I've had my epic Fanatec for over a year now, so it's time to retire it, and by retiring it I mean sell it and pretty much for the price of the G29, shifter and stand buy a stop button for my current rig. Such is the scale of things.

A reminder of what it was...


Tidy unit


#Improved

To get it fit for sale there was a bit of work, not least as the potentiometer for the throttle wasn't really showing much potential for the future.

The lucky purchaser will have a unit that has:
  • A deep cleaned unit - I stripped it right back and blew out every cat hair I could find...
  • I even put dubbin on the leather wheel!
  • A replaced throttle with the clutch unit from a spare - this potentiometer does less work so lasts longer. I.e. refurbed the throttle.
  • Replaced cover - I had a spare, better condition one (one that I hadn't cut in half to get to the pots' to clean them*)
  • An upgraded shifter. It's not Fanatec, but it's a mile better than standard.
  • A cleaned Fanatec stand (still can't believe they put their name to it). I did remove the 'triangle' brace that was on it, though I might chuck that in once explained to the prospective purchaser.
And for all that, someone will hopefully enjoy sim racing just a little bit more.

*My not great potentiometer on the throttle used to flutter at full throttle, a quick blast of contact cleaner and it used to work for a few nights - to facilitate this I cut the back off the pedal casing, it looked ghetto but actually worked better. Not fit for sale though!

And what of the new rig, the one that's roughly 20x the price (OMG saying it like that!).

I re-did all the cabling, that's what. And whilst it doesn't make a great pic, it's far better now than it was...

A lot of cables. Not quite cablegore.

I also put blanking capping in all the channels that are likely to accumulate dust, and by dust I mean red wine when I knock over a full glass getting into the seat. Nothing to see here, move along...

And update time:

Gone...

$300 and that's a good deal for everyone actually.

I hope the two kids who've bought it enjoy it just as much as I did - they'll never know it's had upgraded springs I bet!

Saturday, 2 October 2021

Upgrade your Rim


You might be the owner of the fantastic Fanatec Porsche 918 rim - suitable for racing in all positions and classes with the shift lights that can be seen from space...

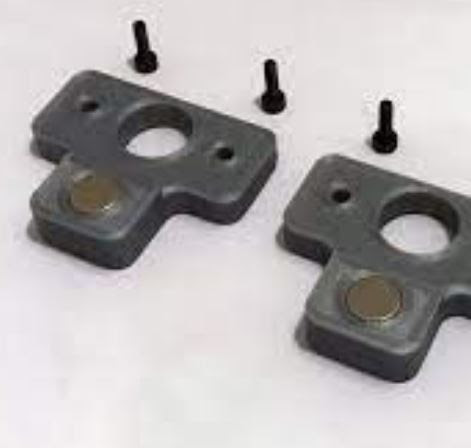
Possibly like me, you’ve considered upgrading the 918 rim’s shifters, they’re smooth, but not ‘snick/click’ like a shifter should be, in my opinion.

To cut to the chase, I bought some of the cheaper magnetic upgrades of eBay, it’s a bolt-on accessory so no harm no foul, etc.

Fitting, easy. Four bolts + a bit of fettling of the 3D printing that was ‘ok’ spec at best.

But, the magnets aren’t touching the shifters – so no click. On reflection, I’m divided on this as it’s kept it all quiet (midnight racing goodness), but then again I’ve not got a definitive click on pulling.

I think there’s more weight, but it’s a bit like putting a K&N on your car – it goes faster because you’re trying harder to notice…

Overall, would I do it again? No. The risk of something bad happening (threading the plastic hole that the M3’s go in, something else breaking) is actually not worth the return on the particular set I got. It’s not a monumental upgrade.

I might be saving for the proper upgrade, they do look good.


You had so much potential

A late post edit to this...

On the 918 wheel you can adjust the shifters fore and aft with a few turns of adjustment. I did this and now these are nearly my favourite addition to the overall sim rig - my shifters snick and click as I wanted them too. And it's very noticeable.

Happy Days!

Monday, 25 January 2021

One Month - Buyers Remorse?

It's been a little over a month now that I've had 'the rig' and I'm pleased to say that buyers remorse hasn't set in. It might be because it was actually a few months ago now that I bought all the gear, or it may be that I'm still getting to grips with the whole setup.

Anyway, like all good projects it's never finished, so this is Rig Evo, or Stage I tune, or whatever bullshiat that we like to call bolting things on to improve (what generally broke anyway).

Here's a rundown of what I've done to change things up a bit...


The standard Fanatec knobs are OK. But the cylindrical one looks like a low earth orbit resupply ship and is about the same size. And the traditional round knob has a rubber band around it of some sort - you'll see them in product shots. Thankfully the shaft (way too much knob/shaft words, sorry profanity filters) is standard fare for car parts. And so a happy half hour lining up this Sparco thing and life is better. I'd prefer a smooth one (not using that word again), but in terms of size, weight and general feel, that'll do for some time I think. Note to buyers, this would be huge on a car though - having similar, but smaller and smoother on my MX5, vicar.


I've posted this elsewhere as a hilarious 'see the bottle of red' holder. But in reality, this is plain and simple a water holder. It is ace. I drink plenty of fluid through my night's gaming thanks to this. The engineering of it is pleasing too....

I bought a metal (and of course black) holder and a couple of bottles from the local store, drilled out the mounting holes, ground down two T-slot bolts (they were too proud for the bottle), and fitted. 

And it works well, it's not in my line of sight, is close enough to reach without being in the way, and without a bottle it is unobtrusive enough to not detract from what is surely a piece of art.

As an aside, I 'stole' a quick-release clippy thing from the pedals (cos there's nothing quick about releasing them) and used it as a hook for my headset, perfect actually. And before I'm lambasted about cheap headsets, this is voice-only and has the great feature of sitting away from one's ear, very important when it's 30.c+ in the room with the air-con on.


Lumbar support is key in this setup. The seat doesn't tilt quite far enough back to support my thighs. It's comfortable enough, but early on I grabbed a cushion from around the house to push my kidneys back to where they should be in the scheme of me. But it was some dour checked affair. 

Then I found this online. It is a thing of beauty and really does sit well in the whole setup. And if you look closely (i.e. inside) you'll see the same house cushion doing its thing. Happy days.


Not so much a new thing, but an adjusted thing, and worth noting for those with these pedals and without simian proportions in arm and leg.

Talking to a fellow TrackRacer owner they mounted the hinges (the silver bit) on the main rail and did away with the uprights. I like this idea, but to do so would mean moving the diagonal supports back further towards the seat - and as you can see, that's not happening.

The solution, and maybe when a mate is around... is to spin the pedal plate by 180 degrees, so they're at the bottom of the plate then I can move the whole thing out away from the seat. The challenge there is that then the setup will be getting too close to Big Rig ergonomics, not Sim Rig. Hmmm. I remain less than enamoured with the pedal setup, but for now it works OK and is comfortable enough.

---

Next? I'm waiting on a handbrake, and as this is a no expense spared build, I've spared no expense at all and bought damn near the cheapest one I could find...

Before I fit this though I'm thinking I'll swap the cheap sponge grip for something more in keeping with the setup - that'll be a case of removing the brake shaft where the two vertically aligned bolts connect it and replace with a length of old bike handlebar (I have plenty). This will allow me to then pick any number of quality grips. Quality.

Certainly, I'll be pulling this apart to get a good look at how it works and see if there are any corners I can uncut in its relatively cheap build.

---

And that's it. I was tempted by the Fanatec McLaren V2 rim that's recently been released, but my racing is all sorts of cars in a single night, so it would be a constant switching of rims. And yes, I have the full quick release shenanigans, it's just not "OMG I'm on fire" quick. So my current rim is fine, very fine in fact, and for the money it all costs, bloody marvellously fine for sure.

Friday, 8 January 2021

New Sim Gear - TrackRacer Fanatec Tears

There's no easy way to say this, I've spent a small fortune on my racing.

What's more, I've limited my options somewhat, with no more PS4 racing (*sniff*). Actually, I'm not so worried about that - the games I rated on there, PCars2 and Assetto Corsa are both equally fine on PC, and the only way I'm going to miss GT Shart is if I take a shot at it.

Rollback to mid-year 2020, the year I suddenly had a lot more free time and a one-time paycheck that would cover a fairly fancy car... and like many, I went through the mill. Towards the end of the year I got myself together, found some work and more importantly got fed up with my G29's pedals.

I'll do an end-of-life review for my old G29, it won't be pretty not least as in the years I owned it I bought at least three of them. The final straw was the never-ending issues with throttle potentiometers, culminating with me angle grinding most of the casing out and like using easy start on some old banger, spraying contact cleaner in before every race night.

From there it wasn't a hard stretch to get where I ended up, I recommend using this list (without prices) on your other half to justify what's close on 1/2 a ton of gaming gear in the living room...

  1. Have a clearly inferior product.
  2. Justify new pedals that don't rely on potentiometers... that's the Fanatec V3 BTW.
  3. As you're doing new pedals, you need a new wheel.
  4. As you're doing Fanatec, might as well be them.
  5. You're only doing this once, so get a direct drive - DD1 < Cheaper than the DD2!
  6. You need a wheel. Any will do, but I opted for a Fanatec Porsche 918 rim, as I race sports and historic more than GT. Glad I did.
  7. Now you've got a DD wheel you need to mount it. TrackRacer's TR8020 is reasonably priced (LOL) and more to the point very configurable and extendable into the future.
  8. Oh yes, almost forgot... (use those words), I'll need a H pattern and sequential, Fanatec does a single unit for that, so that's a saving too!
That's how I ended up waiting for many boxes to arrive that had, all up:
  • TrackRacer TR8020 frame
  • TrackRacer mouse plate add-on
  • TrackRacer digital dash add-on
  • Fanatec DD1 base
  • Fanatec Clubsport V3 pedals
  • Fanatec Porsche 918 rim
  • Fanatec H pattern shifter.
And a serious build exercise, which I'll dig into below. Before that, a very brief summary of what I've learnt through the build experience.

Must Do's:

I watched a review build on the TR8020, and they recommended getting a measuring/square tool thing, I'm sure there's a proper name for it, whatever. Anyway, these were essential tools:


The tape measure is a no-brainer. The socket drive with Allen key adapter was a godsend in the end (so many bolts!), the cutters are to nibble tabs off brackets (you're instructed to) and the blue thing is the fancy measuring thing - also highly important.

Another must do is to watch a few youtube vids of the build, there are a few out there including the official '10min quick start guide'. That's genius, as there is nothing quick about this build other than the realisation that it's going to take a lot of time.

Like me, you'll probably have a cold sweat moment over the lack of instructions. You can find them on the TrackRacer site. They're not great. 

My 'rig' doesn't look like the one in the picture.

In fact, I don't think it ever could. The instructions aren't for the wheel clamp I have (for the DD1) and I struggle to see how the pedal plate lines up. The must-do out of all this - don't be afraid to set the frame to suit your situation.

Wheels... I bought wheels to move it around. In fact, I bought two sets, and have six wheels on my rig (EuroTruck anyone?) to spread the weight a bit. I'm glad I bought that many. And I can tell you I also hate those wheels. I must have fitted them half a dozen times - lining up stuff and making sure the spacer is in the right place. The advice here - experiment with one until it spins freely when mounted to its plate. Did I mention using a ratchet Allen key... 

The last must-do. Learn to dislike the pedal plate set up with a passion. It's the last thing in the instructions... there's a light at the end of the tunnel. But it's a train coming the other way and it's the 'Over-engineering express' train, destination compromise via complex-city. I'll explain below.

The Build:


First post of my new sim-rig. Rate my sim rower!
Was still laughing at this point...


For posterity, this is the build space. Basically, I emptied out the TV room and made space on one side. The rig is on wheels so I roll it across on race (every) night.


Little wins. I have a USB switch box, which allows me to flick headset and keyboard between PC and PS4 Pro. It used to flop around in front of a TV cabinet. No more, in fact, the cabinet is no more either...


Part of the exercise was to remove the old TV cabinet. Over a decade of fluff sat behind there along with a myriad of cables and 'too hard' to remove stuff. 
Yes, that's twin subs, one active, one passive, both romp.


All this got pulled out from the old TV cabinet and behind. Colin Chapman would be proud.


Obligatory box shot. F'ing heavy box shot for that matter.


This was the first box I opened, it is the dash holder - I have a 7" digital dash (old tablet).
This is when I realised that the TR8020 is over-engineered - somewhere there's an armoured car missing a side plate...


Built. I didn't use it like this in the end. The bottom holder is too big for a smaller keyboard. And the top one... well I took an angle grinder to that to get plug space. 
Finally, the waldo arm affair... no. I just used one and some angle clamps to fit it to the frame, it's much simpler and not a meter away from me!


At this point I started opening boxes. Some bags are labelled some are not.


Scaffolding. Some covered, some not. It's a very inconsistent kit.


Manufacturing fail. The DD1 clamp was delivered with paint damage. I'm not surprised, I'm not certain but I think the paint is a black mist that the parts are passed through. You do need to be careful or you're going to have a beater of a rig...


What makes up for the lack of paint is the amount of steel involved. This is for the DD1.
And it's all heavy-duty stuff. 


Wheels. I hate you. I'm glad I have you. You hate me.
On a side note, if you're building this in your living room and you don't have these, good luck.
The amount of wheeling around I did as I worked on the frame, I'm not sure I could have built it without them. Hateful things. Also, brakes, why? No one has a slope in their living room!


The old adage, measure twice cut once is true.
The new adage, measure twice, fit thrice.


Fitting seat rails - measure the bejesus out of these or they won't work.
Also, note that you'll need to move them again anyway when you realise you've maxed adjustment after you've fitted the pedals. Measure twice fit thrice...

This is in fact a happy shot. For some reason fitting the wheel and chair felt like I was nearing the end of the build.


I wasn't.


In true over-engineering style, the shifter plate is on a heavy-duty adjuster plate. I'm tempted to pull that off and have it direct to the 8020 bar that's fitted. It doesn't wobble noticeably in use, but certainly, there is leverage to be had and feel in time.

Fitting (for the fist time) the pedal plate.
You become a man fitting these (several times).


I looked round and all the bits were nearly all used up. Amazing, and very satisfying, somewhat clouded by the tears of drained mojo (this was night three).


Fitted. Note that this is not the final form, I moved it all as the pedals were too high. The adjustment gubbins on the plate is tosh in my opinion. I'm sure it works, and it does allow for a shorter main frame. Except that really you're not going to be altering this very often. I'd have preferred a basic 8020 T-slot affair.


OMG it's actually built


Final form. Note that the pedal plate is now lower where it hinges. 
That was a monumental effort to do. I also had to move the uprights (angles means lower is further away) and only just managed to get the diagonal parts to fit. There's no more adjustment.
In fact, I think at some point I'll buy some T-slot bars and convert to something altogether easier to setup. 

The mouse mat is fitted too, not sure if that's how it's supposed to be done, I think possibly not (as I used dash parts), but it's perfect there like that and only a minor coincidence that beer will sit on there...

---

And that's it. Q&A Time:

Q: Would I do it again.
A: Not without someone to help, it was hard to hold, measure and tighten at the same time.

Q: Buyers remorse then?
A: Not at all. I skip past the cost and just enjoy driving so much more now.

Q: Comfortable?
A: Somewhat. When the pedals were too high it really wasn't. Lowering them and putting a thin cushion (not some epic lumbar roll) behind my lower back helps. And my back is stuffed from a few things. So I'd say ultimately yes.

Q: Do anything different in the build?
A: I'd do the base frame, then pedals then seat. Fit my pedals and get them right before the wheel frame etc. In this way, I think adjustment could have been easier to manage.

Q: Recommendations to TrackRacer?
1. The above point for the pedals. 
2. Sell a six-wheel kit, not four. 
3. Re-design the button/dash setup, it's too heavy and has no cable portholes. 
4. Not sure any picture of a build I've seen works ergonomically. I'm not a freak (mostly) but my rig does not look like others with the pedals off out into the distance.
5. Pre-assemble the seat slider frame - it's the same for everyone and that's complexity that can be avoided.

Q: Of the Fanatec gear
A: All awesome, another post some time into the future...

----

And that's it for this post, a bit like finishing the build, huge, and ultimately something you stare at and wonder why you did it in the first place...

More posts on usage soon I'm sure.

Monday, 20 July 2020

See the light

I think I've established in earlier posts that I'm a cheapskate.
And such is life imitating art I'm in a situation that involves me saving my pennies (cents apparently) and that means old car remains new car for some time.

And much like me it's got a few KMs on the clock now and whilst it functions fine it's a bit wobbly and parts are starting to fail. Unlike me, it's possible to swap stuff out. I'll not bore you with the garage trip today to try and tune out the "It's like an old dryer on spin cycle" handling that it has developed at what I consider low speeds.

No. This post is the apoplectic anger of fitting a new bulb. It's hard enough trying to pull apart a modern car to fit a bulb. I'm no vet, but I reckon I was up to my elbow in my car, and that's not including the 180.deg bend I had to put into my wrist as my arm seemed to be too long and passed the bulb 'pit'. The clips are different on every car, and once my minor panic of removing the entire light fitting was over I was good to go with the 'hard way'.

But what made it worse, far, far worse was the packaging for my discount bulbs...
These in fact:
Plus 60 (...minutes to get into the packaging)

They're not fancy. Not blue, green, red or anything other than normal. They don't discharge in an intensely high way. They are better than standard (of course) but I doubt it.

The packaging though... Clearly, DaVinci had the code to open this. I on the other hand had a screwdriver, pliers and eventually some safety glasses.
You see these lights are entombed in tough brittle clear plastic, in places two layers of the 2mm thick stuff. It was damn near bulletproof frankly.
It wasn't old git proof though... Half an hour I spent getting into this packaging, with shards of plastic flying off all over the place. It really was a war zone as I tried to get into f'ing thing.

It's worse as you're not supposed to touch the bulb too, so they're loose(ish) in this hard casing, and as you work you through the layers to get them like some miner who's seen the diamond but needs to get through 3metres of granite you run the risk of ruining them with the excavations.

Finally I had them free. Then, then the fun started of traversing the front of the car "not touching the bulb" (tm).

There surely is an easier and cheaper way to package these please Repco.

Friday, 19 June 2020

Budget Sim Racing

If you're like me you're broke. Or at least have to avoid checking out fancy multi-thousand dollar 'sim rigs' cos why spend it on the sim when there's a car begging for a new set of pads.

So it's budget time, and I suppose in that space it's cheap shoes - the saying goes buy expensive shoes as they wear out less than cheap ones and ultimately will cost less in the long run (just noticed the pun!). The challenge is to be able to afford expensive shoes upfront. Barefoot it is then.

And so it is that I came to own three G29s in the space of around two years and vowed to never buy another one (one was a warranty swap in fairness). Simply put, anything that's electrical and has contact points is a cheap point of failure. For me, it was the buttons on the wheel and twice pedal pot woes - albeit once self-inflicted (very thin wires inside it turns out).

But this one has lasted - and this the journey I'd like to share, one of customisation on a budget that's ended up with an excellent experience to say the least, and super cheap. I'll go through this in a bit of instruction, a few links and generally share my journey, I hope it helps.

Firstly, the approach - for me enjoying driving is key, and that's about enjoying the sensory touchpoints - it has to sound good, feel good, smell good and probably taste good if that's possible. And the one that's highly subjective, has to look good, but not necessarily in an "I spent a fortune on this" way, no, more an "It's usable and enhances the experience" sort of way. Function over form if you will.

It started with the wheel stand, this one in fact:

It is terrible.
Name and shame, it's actually a Fanatec (yeah man, a Fanatec rig, heh), which goes to show you can swing your manufacturing genius too far to one end of the spectrum, and that's the far end from this to be clear.
The issue, and it's twofold - is firstly as you'll know from elementary maths, is that the hinge at the bottom is a long way away on a lever from the steering wheel - and the clamp thing at the bottom is never ever going to cope with long term abuse on a wheel up top, and it didn't. The second issue is that the pedals just don't sit on the stand, it's polished aluminum for sure (and looks nice) but you'll soon be collecting your pedal box from the carpet with this. There is a sneaky third issue - it's not very heavy, it's OK for standard pedals but if, like me, you awake (quite literally) as you crest the curb at the end of the Mulsanne straight you'll be heavy on the brakes from time to time. This moves the unit.

The solution...
First, Isambard Kingdom Brunel would be proud, build a triangle. So that's what I did.
I bought a length of threaded rod from the local hardware shop (always, always Bunnings) and then fashioned ways to attach it top and bottom. I was going to weld something, but in fact, using wingnuts means I can adjust it - albeit not needing too very often.

It looks something like this:


It doesn't interfere with feet at all, and in fact, became a very handy way to route the myriad of cables up from the floor, and in later pics, you'll see I mounted (cable tied) the power pack on the sled bit at the bottom too. It's still cable mayhem on the floor, but at least my cockpit is clean - always clean your cockpit gentlemen.
This solution is stiff enough that the wheel moves not at all, but has enough give that it'll be the bit that breaks if something does happen, if it's possible to roll a sim in real life I suppose...

Next was pedals - I'll not post the pics here, they're not exciting, but check your pedals for a threaded hole underneath, they'll likely have one. Then it's a matter of fashioning a length of metal to make the clamp. Be careful though - if you clamp down too tight the top casing bends in and cracks - I solved this (on the second set) by using the same material across the top too - so basically the metal does the clamping. You might see it in later pics.

Next, the upgrade of the pedals. If you've not done the GTEye thing for your pedals then I heartily recommend it - just be careful not to catch a (very thin) wire in the casing as that kills them I know...
These are they:


Thrilling.

The final upgrade on the pedals is probably the most important, behold:


This simple (post-race) addition stops the accumulated fluff of household pets from dropping in and carefully wrapping itself around the exposed potentiometers of the pedals. The lesson learned, every so often I spray contact cleaner in there and also a can of air to buff the fluff out basically. Bad design by Logitech frankly.

So to the gears.
There's not really too much wrong with the Logitech gearbox, it's a bit limp but as a H pattern it works OK. But I wanted better feeling in the gears.

So I bought this kit from 3DRap:


Yes, initially it was Strong V2, but it's calmed down now I think. Mostly it's a satisfying snick into gear. First has become a bit softer. It's a non-intrusive change though, so I can replace or remove easily enough. What does it look like on the wheel? Well, err, that is to say I didn't stop there.
No, being the closet Ferrari fan I also bought the gated shifter add-on as well as a metal top plate... and then I bought (more recently) a metal shifter. Originally for my car as a replacement, I didn't like it there. But it works very well indeed on my 'rig'. I can't stress enough the good feeling of a metal knob to fettle through the gears.


It is a thing of beauty to use I must say. Fun times.
And did I stop there? Nope.

I was looking at button boxes, but blimey they're pricy, and they're limited in what they can do - it's a one-trick pony basically. But I happened to be clearing out the tat cupboard (one of them at least, and by cupboard think room) and came across an old tablet. I'd been playing with the idea of a raspberry pi and making that into a touch screen device, but that really is hard and I think the hobby is in the making it, not the using it which is what I wanted.
Enter Stryder. Stryder-IT is some chap who's made an entire touch screen ecosystem for sim racing. It's amazing frankly.
So from a button box, I've gone to full sim dash on the side, with shift lights and lap times the lot. You need to go have a look for yourself - it works on android phones (the best ones) and allows multiple screens per game.

I've done a few of my own in fact:

Assetto Corsa - all the basics

Project Cars 2 - Handy addition to wheel

Rfactor2 - Pit In controls plus essentials

These are awesome, as are some of the amazing designs done by others, all free with the very reasonably priced pro version (<$20).
The tablet itself is so out of date it won't update the O/S anymore and is crazy slow for all but this. I think it's well over five years old. I've left it plugged into the PC to make sure it's charged all the time, and in fact may remove the battery too as don't want battery failure - this thing is more dear to me than any other device I've owned given its current service!

And the installation is like this:


The TV does look a mile away, but it's 65" and not so bad. All a matter of perspective!

And there it all is. But remember I said the stand was too light - yeah, fixed that for sure with all this bolt-on stuff. I rarely notice any carpet creep in the night, even with the stiffer pedals.

Total cost?

One should never price a hobby, so here's the list of bits;

  • Wheel - G29. Prices vary frankly - don't buy second hand, they fail gradually and you'll buy scrap.
  • GTEye upgrade - I did all three springs. Plus an afternoon carefully fitting them (the second time).
  • Fanatec stand - get something else, or get this and build the triangle. Useless without.
  • 3DRap shifter upgrade - I thought it was worth it. Necessary if you're putting a metal shift knob on (weighted throw), which is essential now I've done it.
  • Metal knob - Get onto eBay. Consider how you're going to fasten it to the shift lever, Logitech's isn't standard, so pull it apart and have a look.
  • Sim Dash - get onto eBay, buy the cheapest decent-sized android WiFi tablet you can buy, and install the Stryder-IT dash, even for PS4 it'll work (Assetto and PCars, not GT Shart).
Do I like my solution? Not sure. I like that I've done it, but offer me a proper rig with seat and I'll change in a heartbeat. I'd still have the dash, but could forgo the shifter - actually I'd buy a proper metal shifter and avoid using it on the PS4 I think. In fact, I may even still do that - I feel the shifter won't age well.

And I was thinking of getting a fancy G29 aftermarket wheel, something like this from https://mvhstudios.co.uk/ in fact:


I am in fact still tempted, but then I like driving old cars and this very much is not a quick release solution. I think an upgrade to Thrustmaster, or save many pennies and Fanatec is the way forward. We'll see!

Links to the places I went to buy stuff: